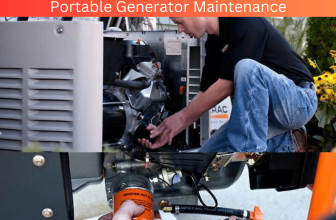
Whether a novice or a seasoned portable generator user, you may have had a frightening notion of portable generator maintenance. “Am I giving my (expensive) generator the greatest possible care?” How could you have known?
It appears to function normally until one day; it does not. And it’s too late at that time. To avoid this, keep reading.
Portable generator maintenance is essential for a long-lasting, healthy portable generator that will provide you with power for many years. On the other hand, neglecting portable generator maintenance chores will rapidly deteriorate the generator.
Maintaining your generator is always less expensive than purchasing a new one. However, even if you instinctively grasp this, you may not know where to begin or how to maintain your portable generator properly. We will inform you about portable generator maintenance and provide some hints.
The Essentials Of Portable Generator Maintenance
Portable generator maintenance is a collection of procedures designed to keep your generator performing at its best. Inspections and oil changes are among these responsibilities, cleaning tubes and inspecting the engine.
These chores may make you feel intimidated unless you’re an engineer. You’re not alone, so don’t worry. There is a distinct border between routine, everyday tasks and those that should only be performed by skilled mechanics, just as with a car or any other item. We, as well as generator makers, recognize this.
The tasks you, the user, must do will be the only emphasis in the following section. As a general rule, all parts that are easily accessible to the user (oil, fuel, spark plugs, etc.) are handled, while all parts that are not (engine, electrical circuits, etc.) are to be serviced by a specialist.
Please consult your user manual before proceeding and take it as your generator Guide. Every portable generator comes with one, the primary source of information on how to use and maintain your particular model.
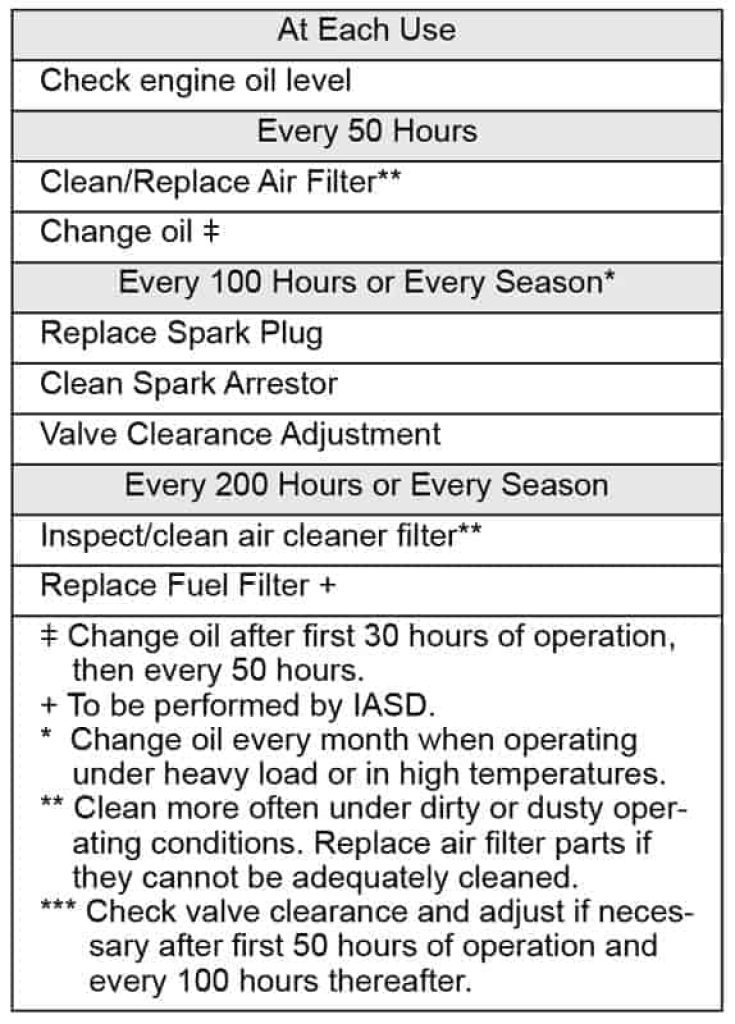
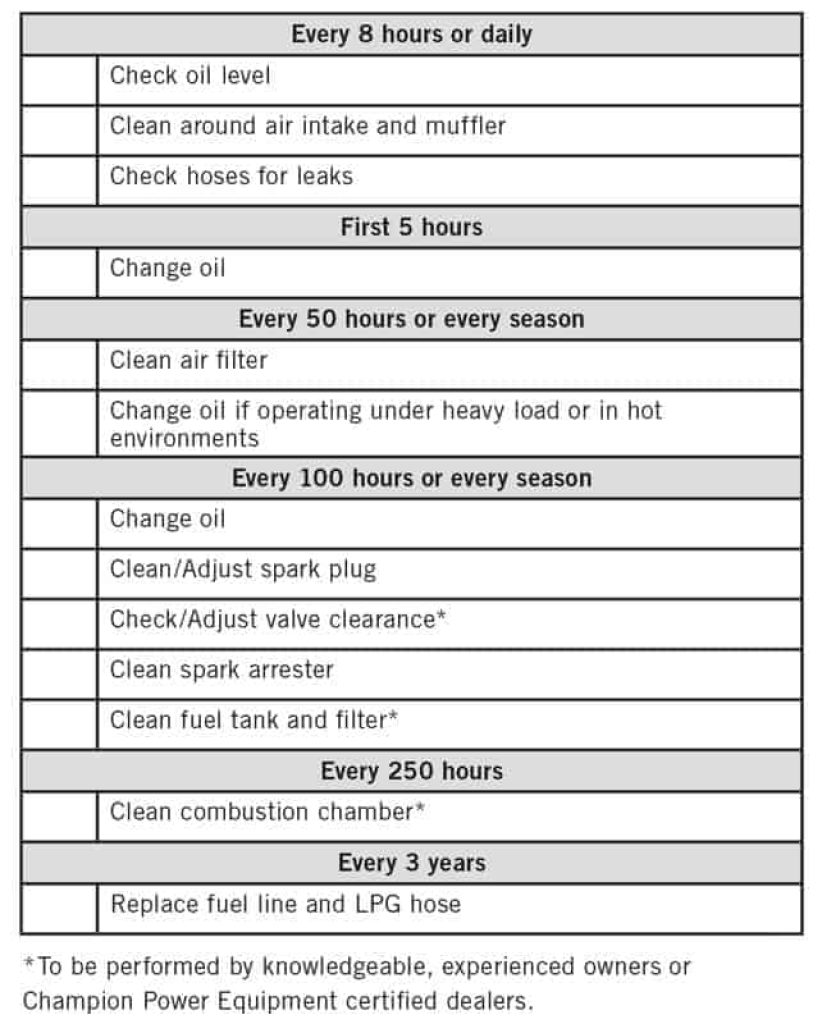
Schedule Of Portable Generator Maintenance
Every user handbook has a chapter on portable generator maintenance, which includes a maintenance plan. This schedule consists of a list of all maintenance chores that should be performed regularly and appropriately. Also included is advice on which jobs should be completed by the customer and which should be managed by a professional. Because these additional portable generator maintenance checks are easily forgotten, note them in your calendar.
Here are some portable generator maintenance schedule instances:

Reminisce On Maintenance
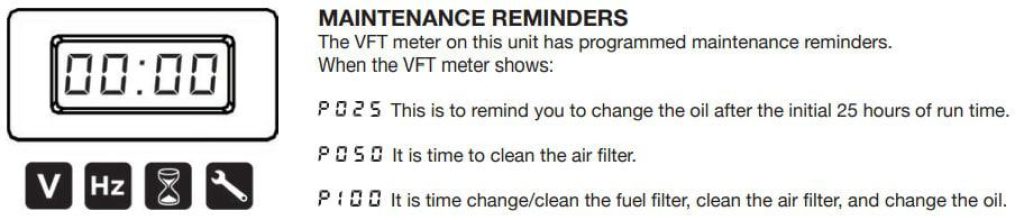
Many units have a portable generator maintenance notice (reminder, etc.) system built right into the data center of the settings menu. Oil change reminders are common, but other items may include a recall to replace your air filter.
It’s worth noting that these systems are frequently not triggered by current oil levels but rather by time. In such instances, an oil check should still be performed before each usage, as detailed earlier in this article.
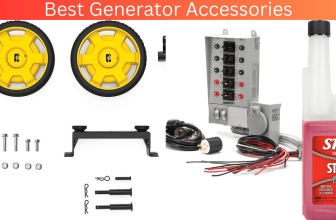
Kits For Portable Generator Maintenance
Some makers or third-party vendors sell “maintenance kits,” which often include common replacement parts (air filters, spark plugs, etc.), oil, and occasionally some gear for dismantling or cleanup.
All of the pieces included are frequently sold separately for a lower price, so we only suggest one of these kits if you’re getting a better deal.
Try to stick to OEM parts as much as possible.

Alamia,Inc Genuine Honda OEM Parts, Maintenance Tune Up Kit, for Honda EU7000iS Generators, Air Filters, Engine Oil, Spark Plug,
Sensors For CO
Any extra instruments in your generator, such as CO sensors, have portable generator maintenance criteria that must be met to function properly.
A CO sensor can have its warning system, which is often based on the frequency of its flashes (similar to standard smoke detectors), to signal when it is nearing the end of its life cycle.
If your device has a CO sensor, pay attention to the extra recommendations in the manual and change your maintenance schedule correspondingly.
Inspection In General
- Simply your senses
- Throughout each use
The planned maintenance is a good beginning point for selecting which maintenance chores should be completed and when, but it’s not the end-all. Air filters can clog up faster than planned; spark plugs can burn out quicker. It’s up to you to solve when the optimal moment is to put on your tool belt and go to work.
Above all, some maintenance programs neglect to include cleaning, adjusting screws, inspecting outlets for dust/dirt, managing extension cords, and replacing electric starter batteries.
As a result, it’s always a good idea to take a little time to complete a brief examination before or after operating your generator. It will indicate a good sign of how well your generator is functioning – if any issues need to be addressed and if your generator is broken. A full examination will warn you of the problem before it becomes too serious.
So, what’s the best way to check your portable generator maintenance? Inspection of accessories is like an interrogator, as any engineer would tell you. Asking the right questions is essential to success. Here are a few instances, but you can also consult a professional.
Is My Generator Functioning Properly, Such As Handling The Load Well, Not Dying, And So On?
Engine difficulties, inadequate fuel injection rate, and other factors might cause a dying or increasingly less efficient motor. Specialist help is required for these problems.
Do I Have An Unexpected Situation Starting My Generator, Or Is It Becoming Worse?
If that’s the case, you should have replaced the spark plug or the battery in your electronic starter long ago.
Are All Of The Nuts And Bolts On My Generator In Place And Fastened?
Before the entire unit starts falling, it’s a great idea to replace/fix any weak or missing nuts and bolts.
Is My Generator’s Body Showing Any Symptoms Of Cracking Or Harm?
Any technical damage should be corrected as soon as possible to prevent it from expanding.
Is My Generator Making The Sound It Should While It’s Working?
While a novice user may find it challenging to troubleshoot solely on noises alone, an off-sounding generator can at least assist you in determining when it’s time to visit your specialist.
Are All Of The Buttons On My Generator Functional?
A loosened, damaged, or ill-fitting button is considerably easier (and less expensive) to repair than the circuit it sits on, which may be destroyed over time as you push, bend, and hit it harder and harder in frustration to make a connection.
Is There Any Oil or Gas Leaking From My Engine?
Many parts of your generators can leak gasoline or oil, posing a serious safety risk and necessitating qualified staff.
Are All of My Electrical Wires In Working Order?
If you have a power problem, such as “no power,” the most frequent cause is that your power cords have been twisted, bent, or otherwise broken. It is easily identified by inspecting the state of the chord along its length, which should be closed and rigid. Furthermore, this technique will warn you about any exposed cord locations, which can and frequently do lead to electrocution in the worst-case situation.
Is There a Strange Odor Coming From My Generator? (Usually Smells Like White Bread)
The smell of burnt bread is a common indicator of carbon build-up in any motor. Carbon build-up lowers your generator’s performance and, in extreme circumstances, can cause irreversible damage and even a fire hazard. If this is the scenario, act hurriedly to get rid of it.
Are All Of My Outlets Tidy And in Good Working Order (Connectors Sit Tight And Are Always Under Power Supply)?
Electrical outlets can become clogged with dirt and dust, resulting in poor or no connection. It is easily remedied by thorough cleaning.
Moreover, a complete socket or its internal components could fall free. It may be necessary to tighten a bolt, but more complicated damage will necessitate professional help. Both “socket”-related problems tend to worsen over time.
Normal Portable Generator Maintenance Tasks And How To Do Them
In addition to what we’ve already discussed, we have put up a quick introduction to some of the most typical generator maintenance jobs. While most of these are relatively general, with a few variations noted, always study your user manual before performing any of the processes below, and prioritize the instructions within over anything you may have seen online.
Cleaning
- Water, soap/detergent, soda, brushes (ideally tube brushes), a pressurized air can, a cloth, and a rag
- Before or after each application
Maintaining your generator is the most fundamental but often disregarded work task.
Any cleaning instructions should be found in the user handbook. Dismantle your generator as per the handbook, and avoid contacting electronics with liquids. Unless the manual says otherwise, clean the generator’s exterior and visible inside. Your warranty may be voided if you force your way into any components. Don’t USE A HOSE OR A Pressure Washer!
Remember to clean and dry any surrounding areas before dismantling, assembling, or changing parts of your generator to minimize the generator’s inside infection, which could cause irreparable damage.
Cleaning can be done in various methods, depending on the surface, area, and type of stains found. Because we can’t predict every stain on every generator, we’ll try to lay down some general cleaning principles, handy techniques, and tactics that should be used in a case-by-case scenario.
Solvents Commonly Used
Water and soap are the finest cleaners for most generator parts, especially the exterior. Common detergents, which frequently have enhanced cleaning capabilities, can also be utilized. Rubbing alcohol, toluene, or other paint thinners/removers is the last resort for fewer polar stains.
Allow the device to dry completely before restarting or plugging it in once you’ve finished cleaning it. Avoid using water on electronics, and think twice about using solvents on your generator’s painted parts.
Coke
Many people are surprised to learn that coke is excellent for removing difficult stains and larger dirt particles. Any portion of your generator that can be removed and submerged in coke for a day or two can be used.
Apparatus For Cleaning
Now that the solvents are gone, you’ll need something to cleanse. Cleaning tools should be carefully considered because the surface of your unit is very fragile.
A cloth or rag is our favorite method, which we utilize everywhere because it does the least harm to the surface. It is always preferable to utilize them damp as opposed to drenched.
If there are any stubborn stains or carbon build-up, you may need to scrub them with a brush. Always choose the gentler variety. Tube brushes will work wonders in cylindrical locations like exhaust pipes and tubes.
Use an air compressor before applying any fluids to electronics, which is especially important in the case of inverters and for cleaning air filters.
To top it off, two mysteries will astound you.
Toothbrush With Extra Softness
Believe it or not, brushes are the most effective cleaning instruments available on the market. They quickly reach difficult-to-clean regions, absorb cleaning solutions, and are ideal for thorough rubbing. To top it off, when compared to specialized cleaning tools, their cost is a joke.
Sponge For The Kitchen
You might use a kitchen sponge instead of towels. They’re wonderful for cleaning the outside of a generator, but they’ll work just as well everywhere they go because they absorb a lot of cleaning solutions and have a rough but soft surface. Just make sure to scrape away any larger dirt clumps first.
Check And Replacement of Oil
- Oil, a funnel (if desired), a dipstick, and potentially disassembly tools (screwdriver, etc.)
- Before or after each usage, check the oil.
- Oil changes are recommended every 50-100 hours or every 3-6 months when the vehicle is idle. When it comes to breaking into your generator, there are some restrictions.
Simply operating your generator dry or without oil can destroy its engine. Some generators may warn you and shut down before this happens. Still, even if they do, if it occurs while you’re working, sitting on the sofa, or doing whatever else you’re doing with your generator, you’ll likely regret not monitoring and replacing your oil sooner.
When it comes to oil changes and oil checks, the following rules apply:
- Check the oil level in your generator before any use.
- Irrespective of oil levels, change your oil every 50-100 hours (precise intervals are provided in the user handbook).
- If it hasn’t been replaced in 3-6 months, look for the oil based on how long you’ve had the generator.
Both methods are detailed in every user manual and may vary somewhat from one generator to another.
Oil inspections are typically done by inserting a dipstick into the generator’s oil-filler neck. We recommend that you use the dipstick that comes with the product.
WEN 55201 Magnetic Oil Dipstick for Inverter Generators (compatible with WEN, Yamaha, Predator)

WEN 55201 Magnetic Oil Dipstick for Inverter Generators (compatible with WEN, Yamaha, Predator)
You must drain any remaining oil from the generator while still warm when changing oil. If your unit isn’t warm, run it for a few moments before continuing unless low oil levels prevent you. Use the oil drain to drain the oil, which should not be confused with the oil filler because they are two separate holes! To assist yourself, lean on the engine to ensure it is empty. Fill the generator with oil only after that. Always avoid overfilling.
Finally, if you have a new generator, you should know the standard break-in process, requiring more frequent oil changes.
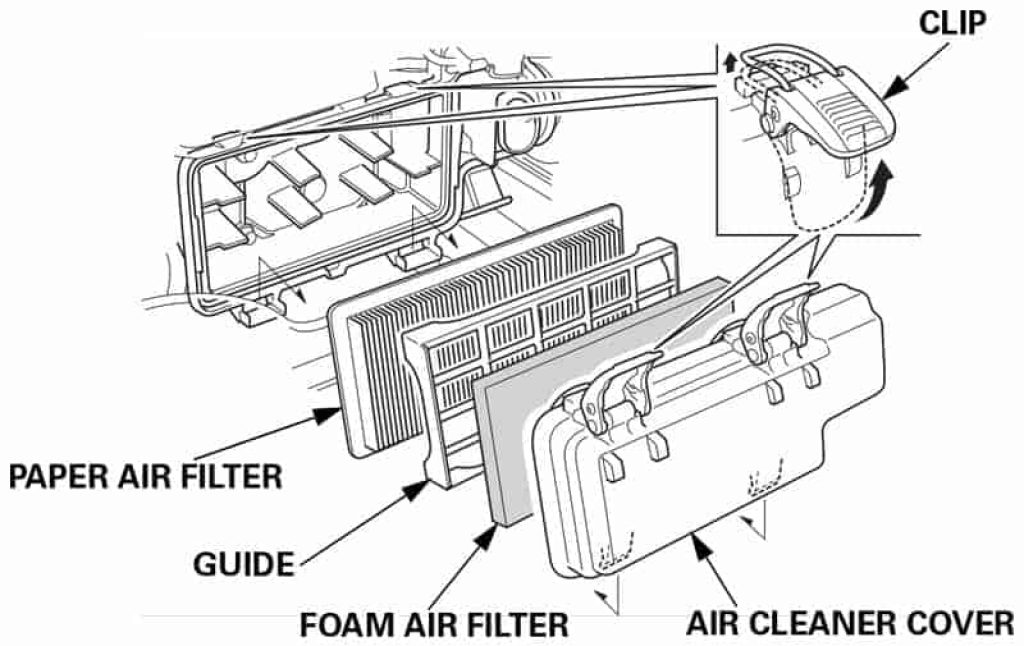
Air Filters: Cleaning And Replacement
- A cloth, kitchen sponges, pressurized air, a cleaning solvent of your choice, and potentially dismantling tools (screwdriver, etc.)
- After 50-100 hours of use, or whenever necessary (e.g., more often in dusty conditions)
The function of an air filter is to keep anything out of your generator. Everything solid gets caught in the filter while anything gaseous passes past.
As a result, the air filter will accumulate layers of particles over time. The build-up will reduce airflow and hence the generator’s functioning; for example, anything gases will no longer pass through the filter directly. As a result, air filters must be cleaned and changed regularly.
Warning
Some generators have paper air filters that cannot be cleaned and must be changed regularly! Before continuing, check the user handbook to see if this is also the case with your air filters.
A can of pressurized air is the easiest tool for cleaning an air filter. Remove the filter and blow through the filter with the can in the reverse way of the normal airflow near the filter. The majority of the build-up will be removed.
For many hours, a more invasive option is to soak the air filter in a pail of soapy water or alcohol (not coke!). If needed, scrape the filter’s surface Gently with a piece of cloth or a dish sponge, never a brush!
Some companies (such as Honda) also recommend immersing the air filter in new engine oil. Before doing so, check your user handbook.
Remember that no matter how carefully or frequently you clean your air filters, they will ultimately wear out. Spare a few spare filters on hand.

Spark Professional And Spark Plug Repair & Maintenance
- Tools for dismantling, a spare plug/arrester, a tiny scrubbing brush, a feeler gauge (wire-type works well) (screwdriver, spark plug wrench, etc.)
- Cleaning is recommended after 50-100 hours of use or as required (e.g., more often in dusty conditions)
- Every 300 hours of usage, one year while not in use, or as needed, depending on their state.
Spark protective devices and spark plugs need to be checked and replaced regularly. Carry a loaded plug/arrestor on hand at all times.
Both spark enclosures and spark plugs must be serviced by removing the part as directed in the user handbook and cleaning both of them and the surrounding region. It is best done with a little wire brush. In most circumstances, no liquids or cleaning solutions are required, while more thorough cleaning may be necessary in other cases.
Always use the spark plugs and spark arresters specified by your generator manufacturer.
Spark arresters must be properly cleaned and inspected for damage. They should be changed immediately if cracked, broken, or ripped.
Spark plugs must be properly cleaned and inspected for damage, particularly the poles, washer sealing, and the diameter of the spark plug gap between the main and side electrodes. The spark plug must be changed if any damage is discovered.
A feeler gauge is used to evaluate the spacing between the spark plugs. The gap should be kept within the range provided in the user handbook, normally around 0.027-0.032. The gap can be manually adjusted if needed by carefully bending the electrode.

Spark plugs must be manually reinserted before being tightened using a spark plug wrench. Some makers go so far as to specify the number of times the spark plug must be inserted. The golden rule, however, is to NEVER REMOVE THE SPARK PLUG!
Check For GFCI
- A bulb, possibly a finger.
- Before each use
If your generator has GFCI (ground fault circuit interrupter) outlets, they must be inspected regularly.
Tripping the grounding generator connection with a specialized testing button and watching to see if the circuit is disrupted are two ways to test GFCI operation. Some generators need you to put an appliance, such as a lamp, into one of the outlets to see if it turns off, while others include simple LED displays. The manual for your generator will detail such a test’s intricacies.
If your GFCI isn’t working, ensure your generator is correctly grounded. If this does not cure the problem, stop using the generator and seek professional help!
Electric Starter Servicing
- A spare battery, a charger, and maybe disassembly tools (screwdriver, etc.)
- As required
Machines with an electric starting have a battery that needs to be examined, recharged, and replaced if it fails or loses charge. Always use the batteries and chargers that the generator’s manufacturer recommends.
Fixing A Fuse
- A spare fuse with the correct rating, and maybe disassembly tools (screwdriver, etc.)
- As required
Though the section is about diagnosing rather than portable generator maintenance, blowing a fuse is a typical occurrence, so we’ll also cover fuse replacement in this article.

A circuit breaker and a fuse are found in every generator. While resetting a circuit breaker is required, fuses must be replaced according to the user handbook. The fuse does not need to be checked regularly.
Remember that each fuse serves a single circuit and is thus rated for the circuit’s amps. As a result, maintain fuses for all of the ratings given by your generator on hand, and always repair fuses with fuses of the same rating.
Valve Clearing Test
- Feeler gauge, perhaps disassembly tools (screwdriver, etc.)
- As required
Maintaining sufficient clearance between the intake and exhaust valves of the generator’s engine is essential for its efficient operation. It is suggested that the clearing be checked every 50-100 hours. You or an authorized professional can modify clearance based on the framework and your confidence – the process can be pretty straightforward, as shown below.
Note: Only inspect the engine while it is cool.
Find the intake and exhaust valves (use your manual). They’re commonly seen side by side, separated by a cover. Rotate the engine without starting; remove the device’s spark plug. Then, as directed in the handbook, remove the valve cover and arrange the valves so that the valve stem you are NOT operating compresses the spring beneath it. Check the diameter of the uncompressed valve stem and spring with the feeler gauge and compare it to the manufacturer’s suggested value. Remember that both too loose and too tight valves are problematic.
Conclusion
With all of the above in mind, you should be able to conduct routine portable generator maintenance efficiently. The list of chores may appear daunting at first, but you’ll soon discover that completing them takes only a minute or two. Given how much hassle it may save you in the long term, consider that time well invested.
If you discover yourself in deep water, don’t be afraid to seek professional help. To maintain your portable generator in top shape, follow the uncovered parts of the methods applied.
Always check your user guide for model details.